Description
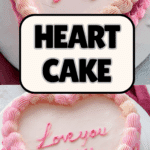
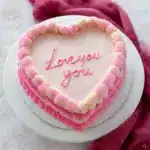
This Vintage Heart Cake is a beautifully crafted, vintage-inspired buttercream cake perfect for celebrating special occasions. Using basic round cake layers transformed into a heart shape, this tutorial guides you through shaping, frosting, and creating delicate vintage piping designs using various Wilton piping tips. The result is a charming and elegant heart-shaped cake with smooth buttercream finishes and vibrant pink piping, ideal for birthdays, anniversaries, or romantic celebrations.
Ingredients
Scale
Cake Layers
- 2 8-inch round cake layers, cooled and leveled
Buttercream Frosting
- About 9 cups (3 batches) vanilla buttercream
- Food color gels: AmeriColor Deep Pink, AmeriColor Fuchsia
Instructions
- Create the Heart-Shaped Cake Layers: Place the first 8-inch round cake layer on a cutting board. Using a serrated knife, cut two angled slices to form the pointed bottom of the heart, removing two smaller pieces which will form the rounded top lobes of the heart. Repeat with the second cake layer, using the first as a template for cutting. Optionally, trace the heart shape onto cardboard using the removed pieces and cut out with an X-acto knife to create a custom cake board.
- Assemble & Crumb Coat the Cake: Place the cardboard base or cake drum on a turntable and spread a little buttercream to fix the first cake layer. Arrange the two curved pieces at the top of the heart shape and adhere with buttercream. Spread a layer of buttercream filling roughly ¼ inch thick, then place the second cake layer on top and attach its curved pieces similarly. Apply a thin crumb coat over the entire cake to seal in crumbs and accentuate the heart shape, carving a more defined “V” at the top as desired. Chill the cake in the refrigerator for at least 30 minutes to firm the frosting.
- Frost the Cake: With the chilled crumb-coated cake on the turntable, apply a smooth, even layer of buttercream frosting. Start by frosting the top with an angled spatula, smoothing down toward the edges, then frost the sides using an icing smoother while rotating the turntable to achieve smooth surfaces. Use the angled spatula to create a sharp buttercream crown at the top edges by swiping inward. Chill the cake again for at least 20 minutes to firm the frosting.
- Color the Buttercream (Optional): Tinted the initial vanilla buttercream light pink with one drop of AmeriColor Deep Pink. Divide remaining buttercream into three bowls in proportions approximately ½, ¼, and ¼ of the remaining buttercream. Add 2 drops each of AmeriColor Fuchsia and Deep Pink to the largest bowl for a bold fuchsia shade; 2 drops of Deep Pink to the second bowl for a darker pink; and keep the third bowl light pink. Fill piping bags fitted with Wilton Tip 4B (largest batch), Tip 32 (light pink), and Tip 102 (mid-tone pink) respectively.
- Create the Vintage Piping: Start by piping a large shell border around the top edge of the chilled, frosted cake using Wilton Tip 4B. Hold the bag at a 45-degree angle, squeeze to fan out the shell, then gradually release to create the tail. Repeat shell piping along the bottom edge. Next, pipe a smaller shell border just inside the large shell borders on the top and bottom using Wilton Tip 32. For the sides, pipe double ruffle garlands with Wilton Tip 102 by moving the bag slightly up and down while squeezing to form ruffle textures, creating semicircle shapes. Add a second ruffle garland on top for a double effect. Connect each ruffle with small piped hearts using Wilton Tip 32 by forming two overlapping shells.
- Write a Message: Using the remaining mid-toned pink buttercream in a piping bag fitted with Wilton Tip 3, write your desired message on top of the cake. For best results, practice piping letters off-cake first. Ensure the buttercream is of a thin, pipe-friendly consistency—warm slightly or add a tiny amount of milk if needed. If unhappy with your first attempt, chill and scrape off the lettering gently and re-pipe. Once satisfied, your vintage heart cake is complete and ready to impress!
Notes
- Use a serrated knife and take your time cutting the heart shape to ensure symmetry.
- Chilling the cake between crumb coating, frosting, and piping helps the buttercream hold its shape better.
- To create neat and even piping designs, practice the shell borders, ruffles, and hearts before piping directly on the cake.
- If desired, a handmade cardboard heart-shaped cake board can enhance presentation and cake stability, but a larger cake drum works well too.
- Adjust food coloring drops to reach preferred tint shades; less coloring will produce softer pastel tones.
- If the buttercream is too stiff for writing, warm the piping bag or add a very small amount of milk to soften it.
- Remove and re-pipe lettering by chilling the cake and gently scraping with a spatula, but aim to get it right the first time for best results.
- Wilton Tips used: 4B for large shells, 32 for small shells and hearts, 102 for ruffles, 3 for writing.
- Prep Time: 40 minutes
- Cook Time: 30 minutes
- Category: Dessert
- Method: Baking, Sculpting, Piping
- Cuisine: American
Nutrition
- Serving Size: 1 slice (1/12th of cake)
- Calories: 350
- Sugar: 28g
- Sodium: 180mg
- Fat: 22g
- Saturated Fat: 14g
- Unsaturated Fat: 6g
- Trans Fat: 0g
- Carbohydrates: 35g
- Fiber: 0.5g
- Protein: 3g
- Cholesterol: 75mg
Keywords: heart shaped cake, vintage cake, buttercream cake, cake decorating, piping tutorial, Valentine cake, pink buttercream, heart cake tutorial, layered cake