
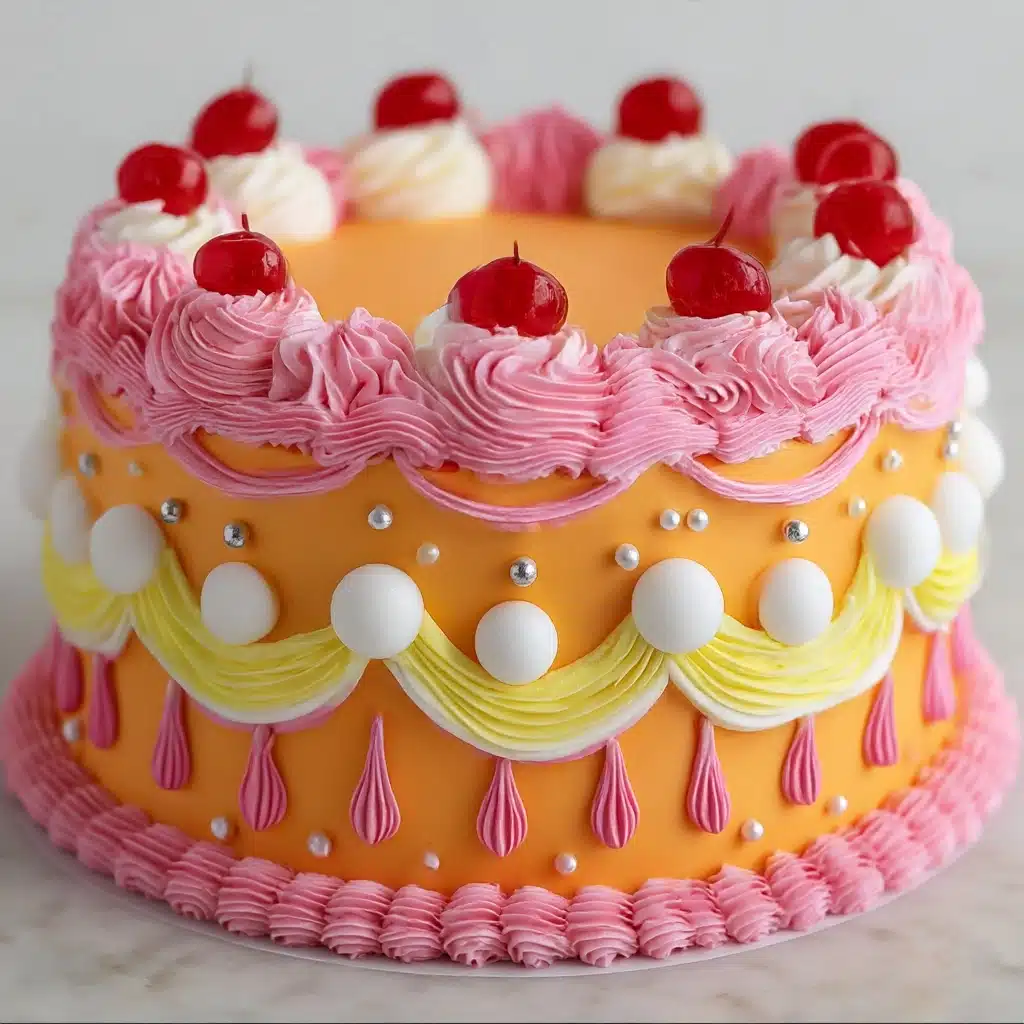
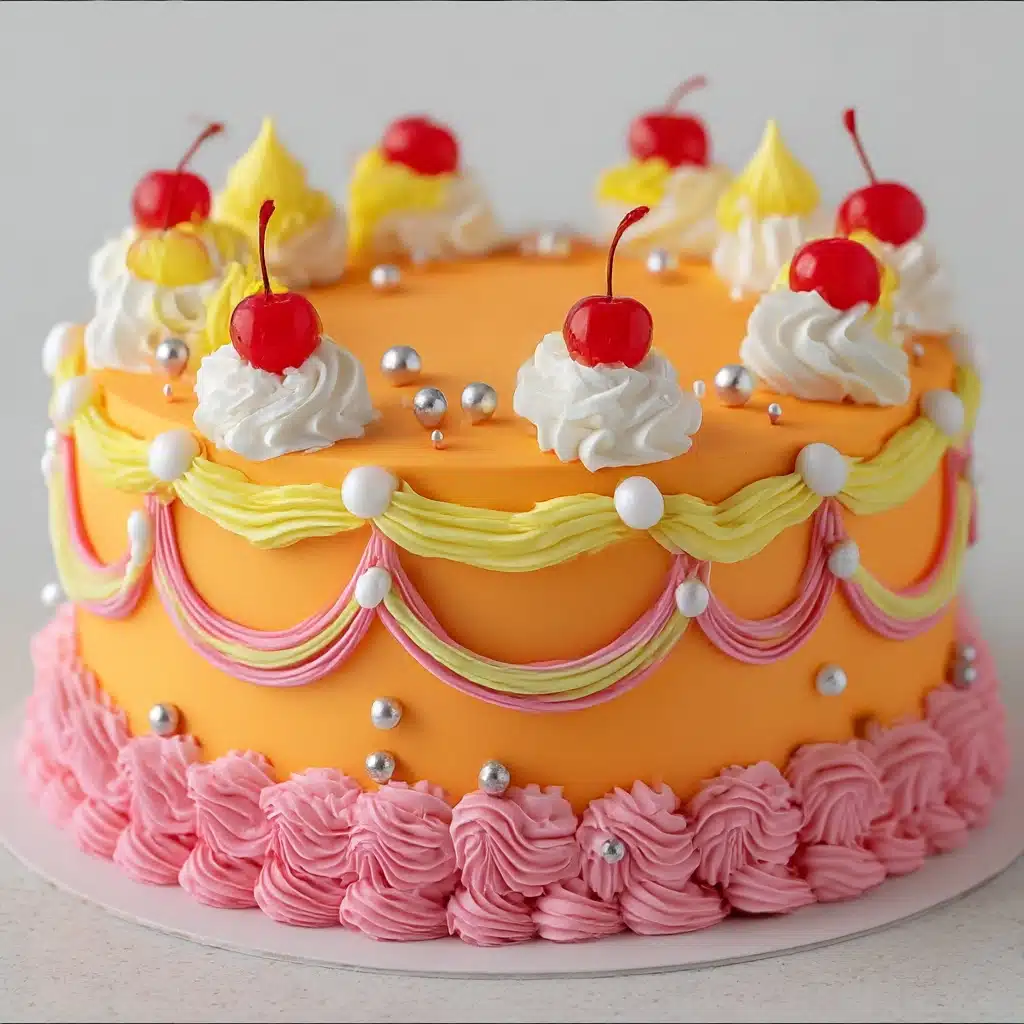
vintage cake Recipe
If you’ve ever dreamed of sinking your fork into a slice of a truly timeless dessert, this vintage cake is going to steal your heart. With its tender crumb, classic vanilla notes, and that dreamy buttercream frosting tinted in soft pastel hues, this vintage cake brings a nostalgic charm to your table. It’s a perfect blend of simplicity and elegance, taking you straight back to those cozy moments filled with warmth, laughter, and just a little touch of old-fashioned magic.
Ingredients You’ll Need
Gathering your ingredients is the first step to this delightful vintage cake experience. Each component is simple yet plays a crucial role in building that perfect balance of flavor, texture, and color that makes this recipe so iconic.
- All-purpose flour (2½ cups): Provides the structure for a tender crumb that holds together beautifully.
- Baking powder (2½ tsp): The secret to that light, airy rise.
- Salt (½ tsp): Enhances all the sweet flavors for a well-rounded taste.
- Unsalted butter, softened (1 cup): Adds richness and moisture, creating a luscious texture.
- Granulated sugar (2 cups): Sweetens the cake while helping achieve that classic golden color.
- Large eggs (4): Bind everything together and add a velvety softness.
- Vanilla extract (1 tbsp): Infuses the cake with its timeless, comforting flavor.
- Whole milk (1 cup): Keeps the crumb moist and tender.
- For the buttercream: Unsalted butter, softened (1½ cups): Foundation for the creamy frosting.
- Powdered sugar, sifted (5 cups): Ensures a silky, smooth finish for the frosting.
- Vanilla extract (1 tbsp): Adds depth to the frosting’s flavor.
- Heavy cream or milk (2–4 tbsp): Adjusts frosting texture to perfection.
- Gel food coloring pastels: Bring that enchanting vintage look with soft, delicate shades.
How to Make vintage cake
Step 1: Prepare and Preheat
Begin by warming up your oven to 350°F (175°C). Don’t forget to grease and line your cake pans with parchment paper. This simple prep ensures your cake layers come out flawlessly without any sticking or crumbling later on.
Step 2: Mix the Dry Ingredients
In a medium bowl, whisk together the all-purpose flour, baking powder, and salt. This evenly distributes the rising agent and seasoning, laying the groundwork for a perfectly balanced cake structure.
Step 3: Cream Butter and Sugar
Using a large bowl, beat your softened butter and granulated sugar until light and fluffy. This process is pivotal because it incorporates air, which helps your vintage cake get that irresistible lift and softness.
Step 4: Add Eggs and Vanilla
One by one, beat in the eggs, making sure each is fully combined before adding the next. Follow this with the vanilla extract to infuse that melt-in-your-mouth nostalgic flavor that’s classic to a vintage cake.
Step 5: Alternate Dry and Wet Ingredients
Now, alternating between the flour mixture and whole milk, gently fold them into the batter. Always start and end with the flour. This method keeps the batter smooth and prevents it from becoming overworked, which preserves tenderness.
Step 6: Bake the Cake
Divide your batter evenly between the prepared pans, smoothing the tops. Pop them into the oven for about 28 to 32 minutes, or until a toothpick inserted into the center comes out clean. There’s your sign the magic is done baking!
Step 7: Cool Your Cakes
Let the cakes rest in their pans for 10 minutes, giving them a chance to settle. Then carefully transfer to a wire rack to cool completely. This step is essential for a flawless frosting application later.
Step 8: Whip Up the Buttercream Frosting
Beat softened butter until creamy, then gradually add powdered sugar. Stir in vanilla extract and heavy cream, adjusting for the desired creamy texture. Don’t forget to divide and tint the frosting with gentle pastel gel colors for that authentic vintage cake charm.
Step 9: Decorate in Classic Vintage Style
Start with a thin crumb coat to lock in crumbs, then chill briefly. Finish by applying a smooth final coat and use piping bags to create delicate vintage details like roses, shells, pearls, and ruffles. This decorative step transforms your cake into a true centerpiece worthy of any retro celebration.
How to Serve vintage cake
Garnishes
Enhance the elegance of your vintage cake with light garnishes such as fresh edible flowers, a sprinkle of pearl sugar, or delicate pastel sprinkles. These subtle touches enhance the cake’s beauty without stealing the spotlight from its intricate frosting work.
Side Dishes
Serve alongside a pot of fragrant tea or a cup of rich coffee for an old-fashioned tea party vibe. Fresh fruit salad or simple whipped cream can also complement the richness of the buttercream, balancing each bite with refreshing brightness.
Creative Ways to Present
For a delightful vintage birthday cake display, place the cake on a classic cake stand surrounded by lace doilies and antique tea cups. Alternatively, you can create mini vintage cakes using this recipe for a charming dessert buffet that invites everyone to indulge in nostalgia.
Make Ahead and Storage
Storing Leftovers
Your vintage cake will keep well in an airtight container at room temperature for up to 3 days. This preserves the moistness of the cake and the softness of the buttercream without any risk of drying out.
Freezing
To keep your vintage cake fresh longer, wrap cooled cake layers tightly in plastic wrap and place them in a freezer-safe bag or container. The cake layers freeze well for up to 2 months. Frosting is best applied fresh after thawing.
Reheating
When ready to enjoy leftovers, simply bring slices to room temperature before serving. Warm them gently in the oven at 300°F (150°C) for 10 to 15 minutes if you want that freshly baked feel, but avoid microwaving as it can melt the frosting unevenly.
FAQs
Can I use a different type of milk for the vintage cake?
Absolutely! While whole milk offers the creamiest texture, you can substitute with buttermilk or almond milk for a slight twist. Just be aware that changes in fat content might subtly affect the cake’s tenderness and flavor.
What if I want a chocolate version of this vintage cake?
You can easily swap out ½ cup of the all-purpose flour for cocoa powder. This little change creates a rich chocolate vintage cake that keeps the same buttery texture and classic feel but with a chocolaty depth.
Is it okay to use store-bought frosting instead of making buttercream?
While store-bought frosting can work in a pinch, nothing beats the fresh taste and creamy texture of homemade buttercream. Plus, making it yourself allows you to customize the colors perfectly for that vintage style effect.
How do I prevent my vintage cake from becoming too dry?
For extra moist layers, try brushing the cake with a simple syrup (equal parts sugar and water boiled until sugar dissolves) before frosting. This keeps every bite tender and the flavors rich.
Can I make this cake gluten-free?
Yes, though you’ll want to use a reliable gluten-free flour blend that measures like all-purpose flour. Keep in mind the texture might be slightly different, but with proper mixing, you can still capture that nostalgic vintage cake essence.
Final Thoughts
Baking this vintage cake feels like wrapping yourself in a warm, sweet memory. It’s not just about the delicious flavor, but the joy of creating something beautiful and timeless. I can’t recommend enough giving this recipe a whirl—whether for a special occasion or just because you deserve a slice of classic happiness today.
Print
vintage cake Recipe
- Total Time: 1 hour
- Yield: 12 servings 1x
- Diet: Vegetarian
Description
This vintage cake recipe brings classic charm and nostalgic flavors to your dessert table. Featuring a tender, buttery sponge layered with smooth, customizable buttercream frosting, it’s perfect for special occasions like tea parties, bridal showers, or birthdays. The pastel-colored buttercream decoration adds a timeless, elegant touch that can be tailored with vintage-style piping designs.
Ingredients
For the Cake:
- 2½ cups all-purpose flour
- 2½ tsp baking powder
- ½ tsp salt
- 1 cup unsalted butter, softened
- 2 cups granulated sugar
- 4 large eggs
- 1 tbsp vanilla extract
- 1 cup whole milk
For the Buttercream Frosting:
- 1½ cups unsalted butter, softened
- 5 cups powdered sugar, sifted
- 1 tbsp vanilla extract
- 2–4 tbsp heavy cream or milk
- Gel food coloring pastels (for vintage style decoration)
Instructions
- Prep and Preheat: Preheat your oven to 350°F (175°C). Grease and line your cake pans with parchment paper to ensure easy removal after baking.
- Make the Cake Batter: In a medium bowl, whisk together the flour, baking powder, and salt until well combined. In a separate large bowl, beat the softened butter and granulated sugar until the mixture is light and fluffy, signaling that enough air has been incorporated. Add the eggs one at a time, beating well after each addition, then mix in the vanilla extract. Gradually alternate adding the dry flour mixture and whole milk to the wet ingredients, starting and ending with the flour mixture, to create a smooth batter.
- Bake: Evenly divide the batter between the prepared pans. Bake them in the preheated oven for 28 to 32 minutes, or until a toothpick inserted in the center comes out clean. Allow the cakes to cool in the pans for about 10 minutes before transferring them to a wire rack to cool completely.
- Make the Frosting: Beat the softened butter until creamy and smooth. Gradually add the sifted powdered sugar, mixing thoroughly after each addition. Stir in the vanilla extract and then add heavy cream or milk, 2 to 4 tablespoons, to achieve your desired frosting consistency. Divide the frosting into portions and tint each with gel food coloring to create soft pastel shades fitting the vintage theme.
- Decorate Vintage Style: Start by applying a thin crumb coat over the cooled cake layers and chill briefly to set it. Then, apply the final, thicker coat of buttercream. Using piping bags fitted with various tips, decorate the cake with vintage elements such as delicate roses, shells, pearls, and ruffles to achieve an elegant retro look.
Notes
- To keep the cake extra moist, brush each layer with simple syrup before frosting.
- For a chocolate variation, substitute ½ cup of the flour with unsweetened cocoa powder.
- This cake is ideal for vintage tea parties, bridal showers, and classic birthday celebrations.
- Ensure all ingredients are at room temperature for the best texture and blending.
- Use gel food coloring over liquid coloring to maintain frosting consistency.
- Prep Time: 20 minutes
- Cook Time: 30 minutes
- Category: Dessert
- Method: Baking
- Cuisine: American
Nutrition
- Serving Size: 1 slice (1/12 of cake)
- Calories: 450
- Sugar: 35g
- Sodium: 220mg
- Fat: 26g
- Saturated Fat: 15g
- Unsaturated Fat: 9g
- Trans Fat: 0.5g
- Carbohydrates: 50g
- Fiber: 1g
- Protein: 5g
- Cholesterol: 90mg
Keywords: vintage cake, vintage cake recipe, retro cake, old-fashioned cake, vintage birthday cake, buttercream vintage cake

