
Decadent No-Bake Oreo Cheesecake Cups Recipe
Introduction
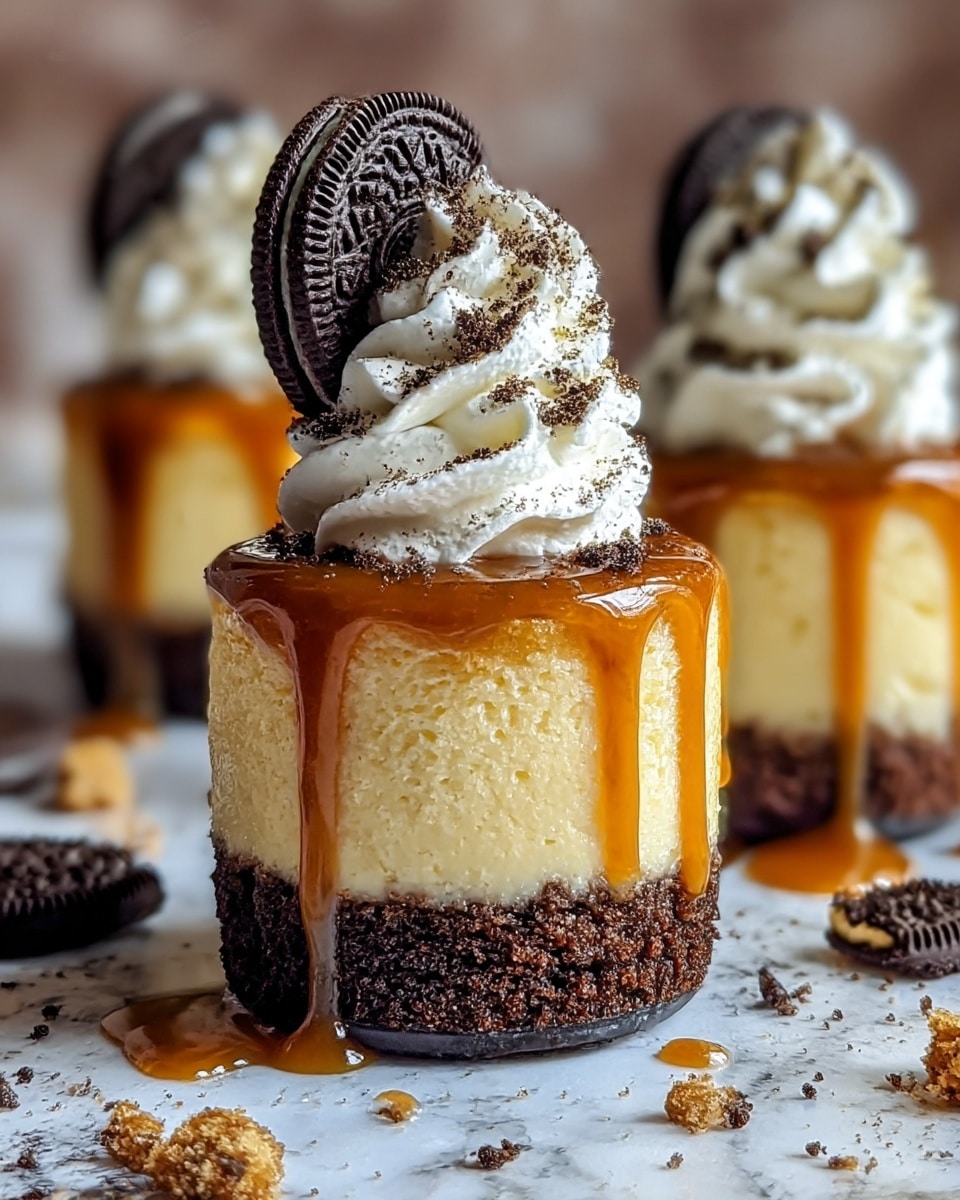
These Decadent No-Bake Oreo Cheesecake Cups are a perfect treat for any occasion. Rich and creamy, layered with crushed Oreos and a smooth cheesecake filling, they offer a delightful blend of textures without the oven time.
Ingredients
- 24 Oreo cookies (divided)
- 4 tablespoons unsalted butter (melted)
- 16 oz cream cheese (softened)
- 1/2 cup granulated sugar
- 1 teaspoon vanilla extract
- 1 cup heavy whipping cream
- 2 tablespoons powdered sugar
- Additional crushed Oreos for topping
Instructions
- Step 1: Prepare the Oreo crust by crushing 16 Oreo cookies into fine crumbs using a food processor. Mix these crumbs with melted butter until well combined. Divide the crust mixture evenly among 6 small cups or jars, pressing firmly to create an even layer at the bottom.
- Step 2: In a mixing bowl, beat the softened cream cheese, granulated sugar, and vanilla extract together until smooth and creamy. Set aside.
- Step 3: In a separate bowl, whip the heavy whipping cream and powdered sugar until stiff peaks form. Gently fold the whipped cream into the cream cheese mixture until fully combined and smooth.
- Step 4: Spoon the cheesecake filling over the Oreo crust in each cup, smoothing the tops with a spatula.
- Step 5: Crush the remaining 8 Oreo cookies and sprinkle them evenly over the cheesecake layer.
- Step 6: Cover the cups with plastic wrap and refrigerate for at least 4 hours, or until set.
- Step 7: Once chilled, remove from the refrigerator. Optionally, add extra whipped cream or Oreo crumbles on top before serving. Enjoy your no-bake dessert!
Tips & Variations
- For a richer crust, toast the Oreo crumbs lightly before mixing with butter.
- Substitute regular Oreos with flavored varieties like mint or golden Oreos for a unique twist.
- Use mini dessert cups to create individual servings perfect for parties.
- To make it gluten-free, use gluten-free chocolate sandwich cookies instead of Oreos.
Storage
Store the cheesecake cups covered in the refrigerator for up to 3 days. When ready to serve, allow them to sit at room temperature for 10 minutes to soften slightly. Avoid freezing, as the texture may change upon thawing.
How to Serve
Serve this delicious recipe with your favorite sides.
FAQs
Can I make these cheesecake cups ahead of time?
Yes, they are ideal for making a day in advance. Just ensure they are well covered and chilled to maintain the texture and freshness.
What can I use instead of heavy whipping cream?
For a lighter option, you can use whipped coconut cream, but the texture and flavor will be slightly different. Avoid using milk or half-and-half as they won’t whip properly.
Print
Decadent No-Bake Oreo Cheesecake Cups Recipe
- Total Time: 4 hours 20 minutes
- Yield: 6 servings 1x
- Diet: Vegetarian
Description
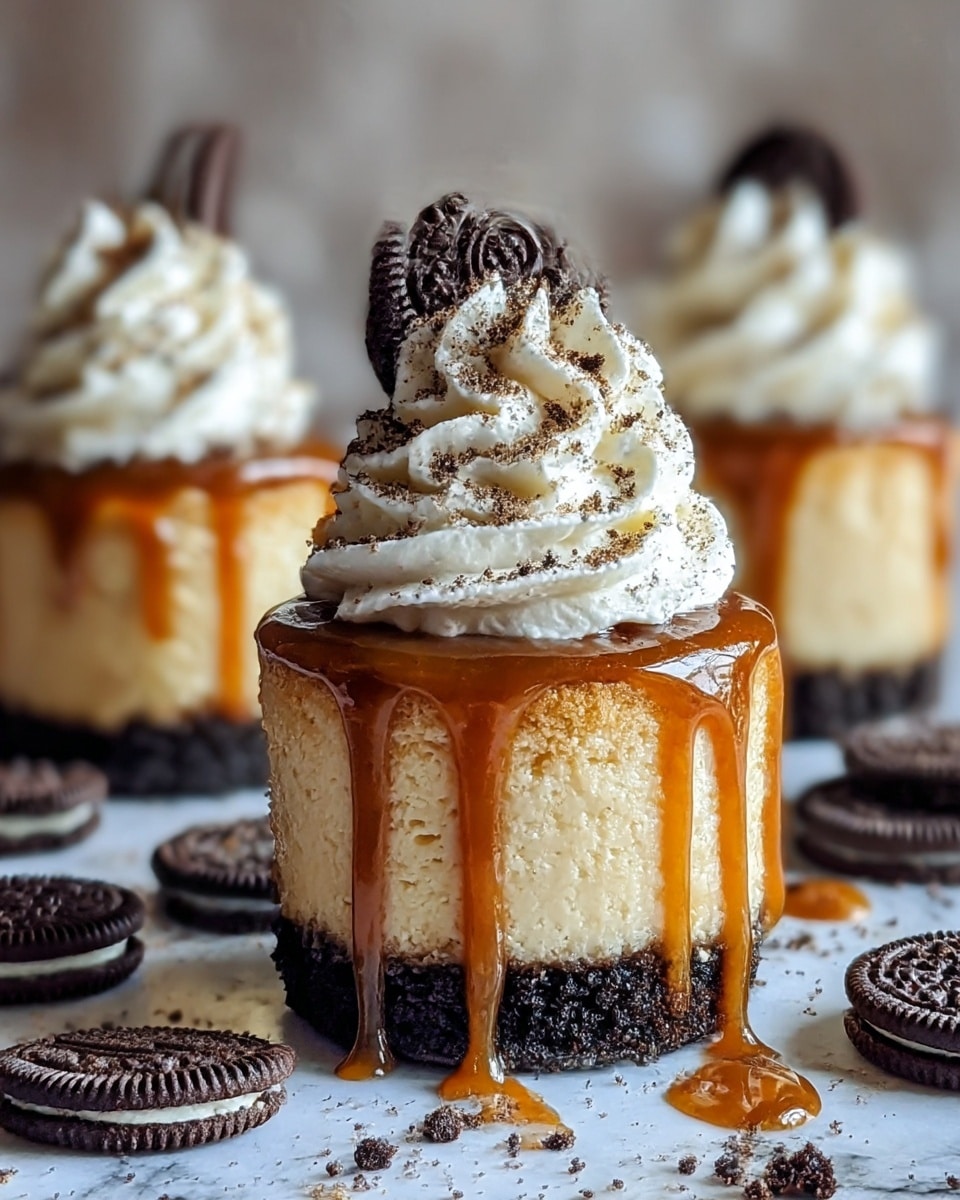
This Decadent No-Bake Oreo Cheesecake Cups recipe offers a delicious and easy-to-make dessert featuring a crunchy Oreo crust layered with smooth, creamy cheesecake filling. Perfect for a quick treat without needing to turn on the oven, these cheesecake cups are topped with crushed Oreos for added texture and flavor.
Ingredients
Oreo Crust
- 16 Oreo cookies
- 4 tablespoons unsalted butter, melted
Cheesecake Filling
- 16 oz cream cheese, softened
- 1/2 cup granulated sugar
- 1 teaspoon vanilla extract
- 1 cup heavy whipping cream
- 2 tablespoons powdered sugar
Topping
- 8 Oreo cookies, crushed
- Additional crushed Oreos for garnish (optional)
Instructions
- Prepare Oreo Crust: In a food processor, crush 16 Oreo cookies into fine crumbs. Mix the crumbs thoroughly with melted butter until fully combined. Evenly divide this crust mixture among 6 small cups or jars, pressing down firmly to create an even, compact layer at the bottom.
- Make Cheesecake Filling: In a mixing bowl, beat the softened cream cheese, granulated sugar, and vanilla extract together until the mixture is smooth and creamy. Set this mixture aside.
- Whip the Cream: In a separate bowl, whip the heavy whipping cream along with the powdered sugar until stiff peaks form, indicating it is fully aerated and stable.
- Combine Filling and Cream: Gently fold the whipped cream into the cream cheese mixture, mixing carefully until the filling is smooth and well combined without deflating the whipped cream.
- Layer the Filling: Spoon the cheesecake filling on top of the Oreo crust in each cup, smoothing the tops with a spatula for an even surface.
- Add Cookies: Crush the remaining 8 Oreo cookies and sprinkle these pieces over the cheesecake layer to add texture and decoration.
- Chill: Cover each cup with plastic wrap and refrigerate for at least 4 hours, or until the cheesecake cups are thoroughly set and chilled.
- Serve: Once chilled, remove the cups from the refrigerator. Optionally, garnish with additional whipped cream or Oreo crumbles before serving. Enjoy your no-bake Oreo cheesecake cups!
Notes
- Ensure the cream cheese is softened to room temperature for easy mixing and a smooth filling.
- Press the Oreo crust firmly into the cups to avoid crumbling when serving.
- Use cold heavy whipping cream for better whipping results.
- Refrigerate the cheesecake cups for at least 4 hours for best firm texture.
- Optional garnishes can include fresh berries, chocolate shavings, or extra Oreos.
- Prep Time: 20 minutes
- Cook Time: 0 minutes
- Category: Dessert
- Method: No-Cook
- Cuisine: American
Keywords: No-Bake Oreo Cheesecake Cups, No Bake Dessert, Oreo Cheesecake, Easy Cheesecake Recipe, Oreo Crust, Cream Cheese Dessert, No Oven Cheesecake

