
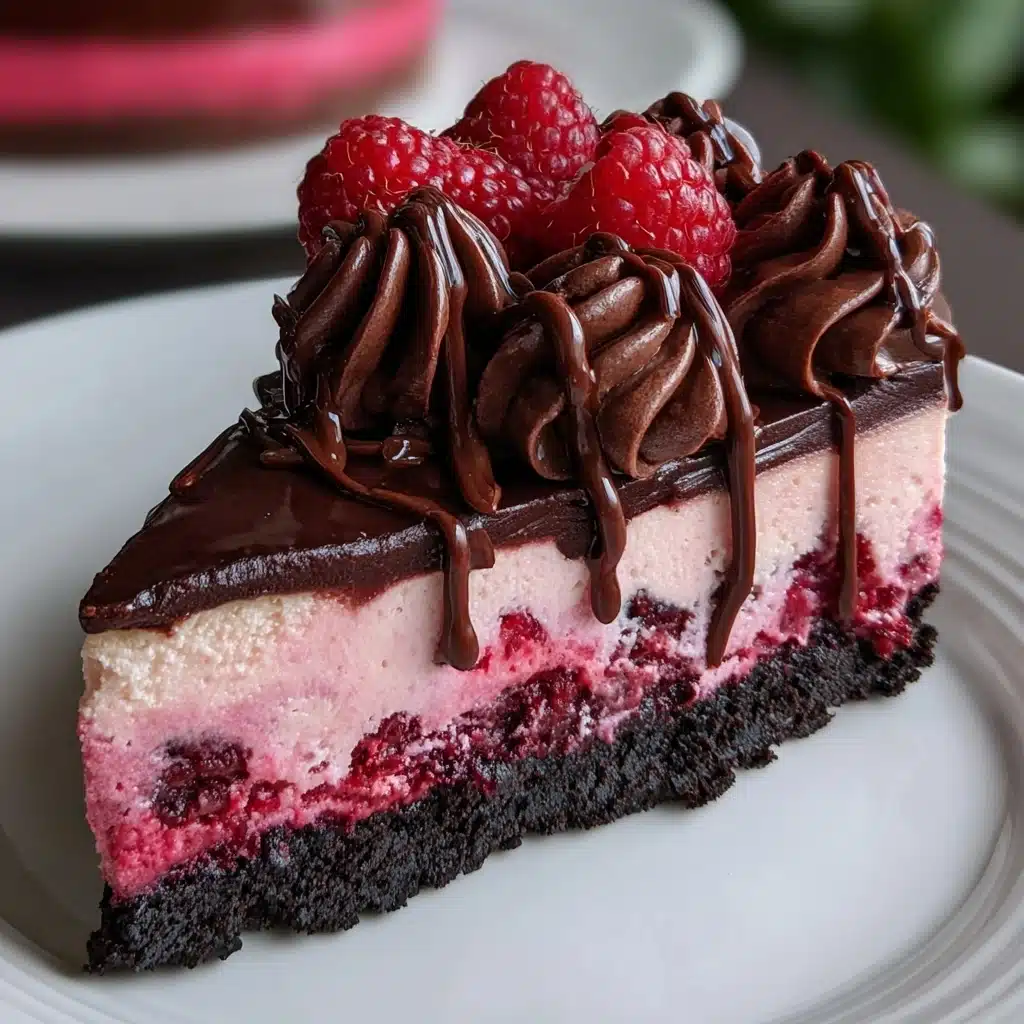
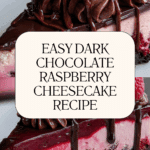
Dark Chocolate Raspberry Cheesecake Made Easy Recipe
If you have a soft spot for rich desserts and fruity indulgence, you are absolutely going to adore this Dark Chocolate Raspberry Cheesecake Made Easy. This recipe marries the deep, velvety flavor of dark chocolate with the fresh, tangy burst of raspberries inside a creamy cheesecake filling atop a crunchy chocolate cookie crust. It’s the perfect balance of texture and taste, delivering a dessert that feels both luxurious and delightfully approachable. Whether you’re treating yourself after a long week or impressing guests at your next gathering, this cheesecake will quickly become a treasured favorite.
Ingredients You’ll Need
Gathering simple yet high-quality ingredients is the secret behind creating a memorable cheesecake. Each component plays a crucial role in building the luscious texture, rich chocolate undertones, and vibrant raspberry accents that define this dessert.
- Chocolate cookies (2 cups): These crushed cookies give the crust a crunchy, chocolatey base that perfectly complements the creamy filling.
- Melted butter (¼ cup): Helps bind the crust together and adds a subtle richness.
- Cream cheese (24 oz, softened): The heart of the cheesecake, lending that smooth, creamy body everyone loves.
- Granulated sugar (½ cup): Balances the tartness of the raspberries and sweetness of the chocolate.
- Melted dark chocolate (¼ cup): Infuses the filling with deep cocoa flavor and a luxurious silky texture.
- Vanilla extract (1 tsp): Enhances the overall flavor and rounds out the chocolate notes.
- Large eggs (3): Essential for structure and that classic cheesecake creaminess.
- Fresh raspberries (½ cup): Adds natural tartness and bright, juicy pockets of flavor to the filling.
How to Make Dark Chocolate Raspberry Cheesecake Made Easy
Step 1: Preheat and Prepare Your Pan
Start by heating your oven to 325°F (160°C). Lightly grease a 9-inch springform pan, or better yet, line its base with parchment paper for a hassle-free removal later on. Getting your equipment ready upfront means fewer interruptions while you mix your delicious layers.
Step 2: Mix and Press the Crust
Combine your crushed chocolate cookies with the melted butter in a medium bowl until the mixture resembles damp sand. This ensures the crust will hold together firmly but stay crumbly to give you a satisfying bite. Press this mixture evenly into your prepared pan, using the back of a spoon or even a glass bottom to really compact it. This forms the sturdy foundation your cheesecake filling deserves.
Step 3: Cream the Base
In a large bowl, beat your softened cream cheese and sugar until they become luxuriously smooth and creamy—no lumps allowed! When the texture is just right, fold in your melted dark chocolate and vanilla extract. This blend transforms the cheesecake into a rich and indulgent experience that’s impossible to resist.
Step 4: Incorporate Eggs Gently
Add the eggs one by one, mixing on low speed after each addition. This slow and steady approach keeps the batter from over-beating, which means no cracks after baking. The eggs bind everything together so your cheesecake holds its perfect shape while staying melt-in-your-mouth creamy.
Step 5: Fold in the Raspberries with Care
Now for the beautiful pops of flavor! Carefully fold fresh raspberries into your batter using a spatula. Avoid pressing or crushing them—you want those whole raspberries to peek through baked against the rich chocolate, creating bursts of freshness in every slice.
Step 6: Assemble and Bake to Perfection
Pour the luscious batter over your crust and smooth the top gently. Tap the pan on the counter a few times to shake out any trapped air bubbles, which helps keep the texture velvety. Slide your cheesecake into the oven and bake for around 60 minutes. It should look mostly set in the center with a slight wiggle—that’s the signal it’s perfect because it will firm up completely as it cools.
Step 7: Cool, Chill, and Set
Once baked, allow your cheesecake to return to room temperature before transferring it to the fridge for at least 4 hours, though overnight chilling is even better. This resting time lets everything settle into an ideal sliceable texture that’s rich, smooth, and incredibly flavorful.
Step 8: Serving Up the Best Dark Chocolate Raspberry Cheesecake Made Easy
Before cutting your cheesecake, add a personal touch with some fresh raspberries, a chocolate drizzle, or even a light dusting of powdered sugar. These simple details make dessert feel special and elevate presentation for any occasion.
How to Serve Dark Chocolate Raspberry Cheesecake Made Easy

Garnishes
The ideal garnishes take this cheesecake to the next level without overpowering its rich essence. Fresh raspberries add vibrant color and a pop of tartness, a drizzle of melted dark chocolate deepens the indulgence, and a sprinkle of powdered sugar adds a delicate sweetness and pretty finish.
Side Dishes
This cheesecake pairs beautifully with a dollop of freshly whipped cream or a scoop of vanilla bean ice cream to cool down the richness. For a refreshing contrast, serve with a light raspberry coulis or even a handful of roasted nuts like almonds or pecans for texture balance.
Creative Ways to Present
Try slicing your cheesecake into elegant wedges and placing each slice on a contrasting white plate to highlight the rich chocolate tones. For a party, serve mini servings in individual jars or small ramekins topped with a raspberry or mint leaf for instant charm and easy portioning.
Make Ahead and Storage
Storing Leftovers
Your Dark Chocolate Raspberry Cheesecake Made Easy can be stored in an airtight container or covered tightly with plastic wrap in the refrigerator for up to 4 days. Keep it chilled to maintain its creamy texture and freshness of those juicy raspberries.
Freezing
If you want to keep it longer, wrap the cheesecake securely in plastic wrap and aluminum foil, then place it in the freezer. Properly stored, it will retain its delicious flavor for up to 2 months. When ready to enjoy, thaw overnight in the fridge for best results.
Reheating
Cheesecake is usually best served chilled, but if you prefer a slightly warmer slice, let it sit at room temperature for 15 to 20 minutes before serving. Avoid microwaving as it can alter the texture and cause the cream cheese to become grainy.
FAQs
Can I use frozen raspberries in this recipe?
Yes, frozen raspberries can work in a pinch but be sure to thaw and drain them well to prevent excess moisture from making your cheesecake watery. Fresh raspberries provide the best texture and flavor.
What type of dark chocolate should I use?
Choose a high-quality dark chocolate with at least 60% cocoa content. This gives the cheesecake a rich flavor without too much bitterness, perfectly balancing the sweet and tart raspberry notes.
How can I avoid cracks on my cheesecake surface?
Mix gently without overbeating and avoid sudden temperature changes. Baking at a low temperature and letting the cake cool gradually before chilling helps keep the top smooth and crack-free.
Why does my cheesecake need to chill so long?
Chilling allows the filling to set fully, which makes the texture creamy and sliceable rather than runny. It also helps the flavors to meld beautifully, especially the chocolate and raspberry harmony.
Can I substitute the crust with something else?
Absolutely! If you want a different flavor or texture, try graham cracker crumbs or even ground nuts mixed with butter. Just make sure it complements the chocolate and raspberry flavors without overpowering them.
Final Thoughts
There’s something truly special about a dessert that combines decadence with ease, and this Dark Chocolate Raspberry Cheesecake Made Easy fits the bill perfectly. Rich, creamy, and bursting with fresh raspberries, it’s a timeless treat that invites you to savor each bite. I encourage you to give this recipe a whirl and watch it become a beloved staple in your dessert repertoire. Trust me, once you try it, you’ll wonder how you ever lived without this magical combination!
Print
Dark Chocolate Raspberry Cheesecake Made Easy Recipe
- Total Time: 4 hours 20 minutes (including chilling time)
- Yield: 8 servings 1x
- Diet: Vegetarian
Description
This Dark Chocolate Raspberry Cheesecake combines rich, creamy cheesecake with the intense flavors of dark chocolate and fresh raspberries. Featuring a chocolate cookie crust and a smooth filling swirled with juicy raspberries, this dessert is perfect for special occasions or a decadent treat. Easy to make and elegant to serve, it offers a beautiful balance of tart fruit and deep chocolate in every bite.
Ingredients
The Crust:
- 2 cups crushed chocolate cookies (such as chocolate graham crackers)
- ¼ cup melted butter
The Filling:
- 24 oz cream cheese, softened
- ½ cup granulated sugar
- ¼ cup melted dark chocolate
- 1 tsp vanilla extract
- 3 large eggs
- ½ cup fresh raspberries
Instructions
- Preheat the Oven: Preheat your oven to 325°F (160°C). Lightly grease a 9-inch springform pan, or line the bottom with parchment paper for easy removal.
- Make the Crust: In a medium bowl, mix the crushed chocolate cookies with melted butter until the texture resembles wet sand. Press the mixture firmly into the bottom of the prepared springform pan to form an even crust. Use the back of a spoon or flat-bottomed glass to help compress the crust tightly.
- Prepare the Cheesecake Batter: In a large mixing bowl, beat the softened cream cheese and sugar together until smooth and creamy. Add in the melted dark chocolate and vanilla extract, beating until well incorporated.
- Add the Eggs: Add the eggs one at a time, mixing on low speed after each addition until just combined. Avoid overmixing to prevent cracks during baking.
- Fold in Raspberries: Gently fold in the fresh raspberries with a spatula. Be careful not to crush them, as you want whole berries scattered throughout the cheesecake for beautiful bursts of flavor.
- Assemble and Bake: Pour the cheesecake batter over the prepared crust and smooth the top. Tap the pan gently on the counter to release any air bubbles. Bake in the preheated oven for 60 minutes, or until the center is mostly set but still slightly jiggly. The cheesecake will continue to firm up as it cools.
- Cool and Chill: Remove from the oven and let the cheesecake cool to room temperature. Then refrigerate for at least 4 hours, or preferably overnight, to allow it to fully set.
- Serve and Enjoy: Before serving, you can top with additional fresh raspberries, a drizzle of melted chocolate, or a dusting of powdered sugar for an elegant finish.
Notes
- For best results, use full-fat cream cheese for a creamy texture.
- Make sure the cream cheese is softened to avoid lumps in your batter.
- Be gentle when folding in raspberries to keep them intact.
- Using a springform pan makes removing the cheesecake easier.
- Letting the cheesecake chill overnight improves texture and flavor.
- To avoid cracks, do not overmix the batter and bake at a low temperature.
- Room temperature ingredients blend better and create a smoother filling.
- Prep Time: 20 minutes
- Cook Time: 60 minutes
- Category: Dessert
- Method: Baking
- Cuisine: American
Nutrition
- Serving Size: 1 slice (1/8 of cheesecake)
- Calories: 420 kcal
- Sugar: 20 g
- Sodium: 210 mg
- Fat: 32 g
- Saturated Fat: 18 g
- Unsaturated Fat: 12 g
- Trans Fat: 0.5 g
- Carbohydrates: 25 g
- Fiber: 3 g
- Protein: 7 g
- Cholesterol: 110 mg
Keywords: dark chocolate cheesecake, raspberry cheesecake, chocolate raspberry dessert, creamy cheesecake, easy cheesecake recipe, baked cheesecake